Creating Your First rental
This guide walks you through the complete process of creating a new rental in CloudRent Pro, from selecting a customer to adding equipment and configuring delivery.
Overview
Creating a rental is a streamlined two-step process:
Quick Booking Modal — Select dates, customer, and booking type
Rental Form — Add equipment, configure delivery, and set pricing
Required vs Optional Fields
✓ Required
Customer
Start Date
End Date
At least 1 item
Booking Type (Job/Quote)
○ Optional
Reference / PO Number
Customer & Internal Notes
Delivery configuration
Sections for organizing
Discounts
Step 1: Quick Booking Modal

Click the New Rental button (or use the calendar icon in the header) to open the Quick Booking Modal.
Select Rental Period
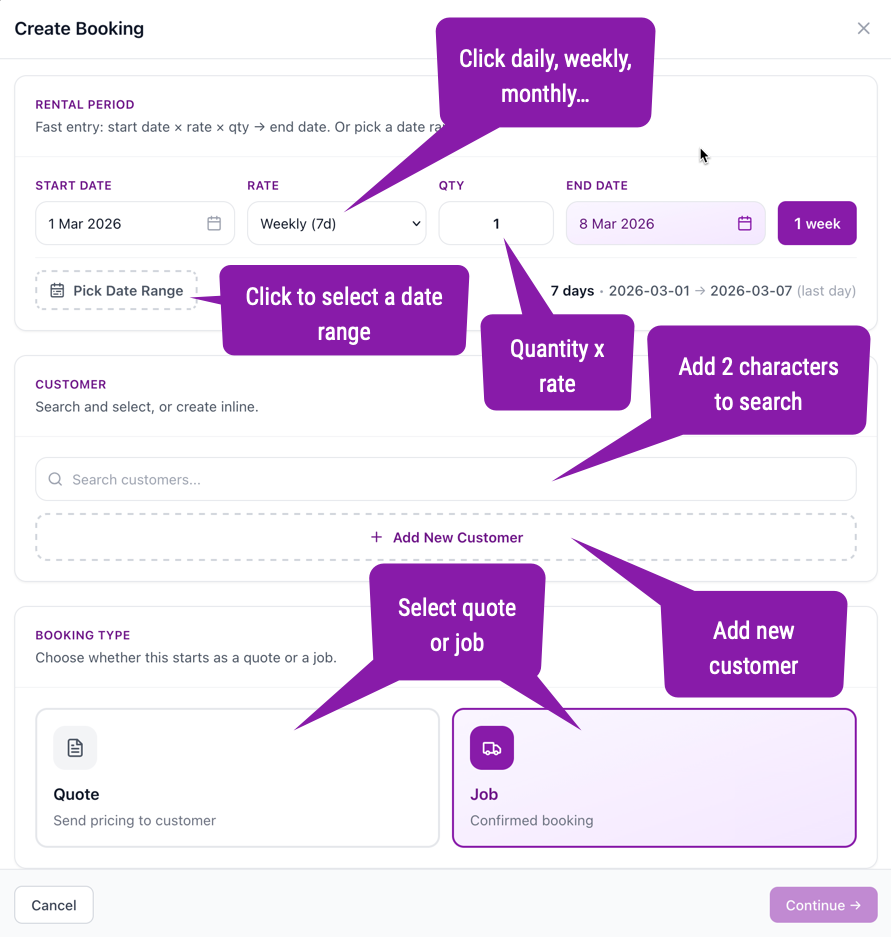
Choose start date, rate type (Daily/Weekly/Monthly), and quantity. The end date calculates automatically: Start + (Rate × Qty)
Select Customer
Search existing customers or create a new one inline by entering name, email, and phone.
Choose Booking Type
Job = Confirmed & ready for dispatch. Quote = Draft for customer approval.
Continue
Click Continue to proceed to the detailed rental form.
💡
Tip: Toggle "Pick Date Range" to manually select both start and end dates instead of using the formula.
Step 2: Rental Form
The rental form is where you configure all the details including equipment, pricing, delivery, and notes.
Adding Equipment
Click + Add Equipment to open the Quick Add Modal:
Search by equipment name, category, or type
Select tab: Rental, Service, or Sale items
Adjust quantities using +/- buttons (shows real-time availability)
Click Add Items to add to rental
Item Types
Type | Description | Pricing |
|---|---|---|
Rental | Standard equipment with availability tracking | Duration-based (daily/weekly/monthly) |
Service | Labor, operators, delivery services | Typically hourly |
Sale | Consumables, accessories (one-time purchase) | Fixed price, no duration |
Editing Items
Click any added item to edit:
Quantity — Adjust within available limits
Price Type — Hourly, Daily, Weekly, or Monthly
Unit Price — Override the default price
Deposit — Set per-unit deposit amount
ℹ️
Note: If you request more than available, CloudRent Pro can create a transfer request or sub-rental order.
Organizing with Sections
For complex jobs with multiple phases, use sections to organize items:
Click + Add Section
Enter section name, description, and optional date range
Drag items into the appropriate section
Step 3: Delivery Configuration
Delivery Type
🏪 Customer Pickup
Customer collects from your location. No delivery charges. Choose if customer returns or you collect.
🚚 Delivery
You deliver to customer's site. Optional delivery charges apply. Choose if you collect or customer returns.
Delivery Address
When delivery is selected, choose the address:
Customer's delivery address (from profile)
Customer's billing address
Custom address (enter manually)
Delivery Pricing
Model | Fields | Calculation |
|---|---|---|
Per KM | Distance, Direction, Rate/km | Distance × Rate × Direction |
Flat Rate | Delivery fee, Collection fee | Delivery + Collection (if applicable) |
Step 4: Pricing & Totals
Price Types
Type | Calculation |
|---|---|
Hourly | Days × 24 hours |
Daily | Number of days |
Weekly | Days ÷ 7 (rounded up) |
Monthly | Days ÷ 30 (rounded up) |
Total Calculation
Subtotal = Sum of (Unit Price × Quantity × Duration) for all items
+ Delivery = Delivery charges (if applicable)
− Discount = Fixed amount or percentage
+ Tax = (Subtotal + Delivery − Discount) × Tax Rate
= Total
Adjustments
Tax Rate — Default 10% (configurable)
Discount — Fixed ($) or percentage (%) with optional reason
Deposit — Sum of all item deposits, applied on return
Rental Status Workflow
After creation, rentals progress through these statuses:
Status | Meaning | Actions |
|---|---|---|
Draft | Quote awaiting approval | Edit, Convert to Job |
Confirmed | Ready for dispatch | Schedule delivery, Assign staff |
Active | Equipment with customer | Track returns, Record damage |
Completed | All items returned | View invoice, History |
Tips for Efficient Rentals
👥 Pre-enter Customers
Add customer profiles with delivery addresses to speed up repeat bookings.
💰 Set Default Pricing
Configure pricing tiers in equipment master to avoid manual overrides.
📂 Use Sections
Organize complex multi-phase jobs with sections for clarity.
📝 Quote First
Create quotes (Draft) for customer approval before confirming.
🎯
Pro Tip: Use the global search (Cmd/Ctrl + K) to quickly find existing rentals, customers, or equipment from anywhere in the app.